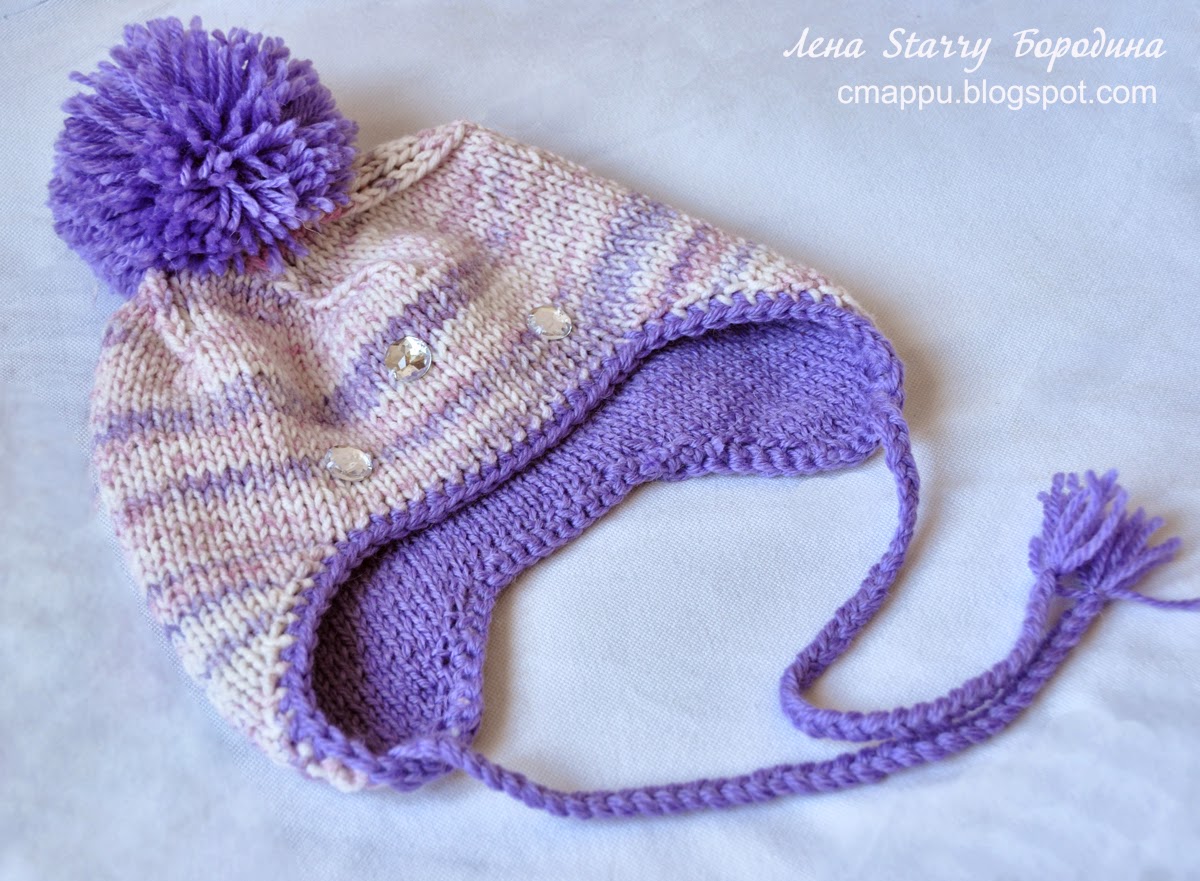
Caciula tricotata copii - Children Knitted Hat
MATERIALS:
-
Yarn
phildar Quietude (100 gr= 180 m)- 50% wool, 50% acrylic
-
5 double pointed Needles US 3 (3, 25 mm) or size needed to obtain gauge(also you can use circular needles).
- Stitch marker.
Gauge
12 sts / 19 rows = 5 cm/ 5 cm (2””/ 2”)
SIZE:
-
6-12 months (16” head
circumference= approx 42 cm);
-
12 – 24 months (18” head
circumference= approx 45 cm)
-
6-12 months (20” head
circumference= approx 50,8 cm)
ABBREVIATIONS
-
BO = bind off
-
ch(s) = chain(s)
-
CO = cast on
-
cont = continu(e)(s)(ing)
-
dbl = double
-
dec = decreas(e)(s)(ing)
-
dpn(s) = double pointed needle(s)
-
k = knit (ochi pe fata)
-
k2tog = knit 2 together (2 ochiuri lucrate impreuna pe fata, rezulta unul singur)
-
p2tog = purl 2 together (2 ochiuri lucrate impreuna pe dos, rezulta unul singur)
-
lp(s) = loop(s)
-
M1 = make 1 (inmultim 1 ochi)
-
ndl(s) = needle(s)
-
p = purl (ochi pe dos)
-
pat = pattern
-
Pm = place marker
- PU = pick up (ridicam...... ochiuri)
-
rem = remain(s)(ing)
-
rep = repeat(s)(ing)
-
rnd(s) = round(s)
-
RS = right side
-
sl st = slip stitch
-
slip1-k1-psso = slip 1, knit 1, pass slip stitch
over (primul ochi il luam neluacrat, tricotam urmatorul pe fata, ochiul nelucrat se trece peste cel lucrat, rezulta un singur ochi)
-
sm = slip marker
-
yfwd= yarn forward (jeteu)
NOTE
It is knitted in the round.
You can change colors as you
prefer.Also you can make it with other yarn
Se
lucreaza circular pe ace cu varf dublu de 3,25 mm. Lucram separat caciula de marginea cu feunzele. apoi desfacem firul provizoriu , repunem ochiurile pe ac si incheiem
CO
102 ochiuri (by Provisional Cast-On)
http://www.youtube.com/watch?v=3OGG0AiJ3XE
Lucram
in continuare 11-12 cm, circular, numai pe fata, dupa care , incepem sa scadem
(shape crown).
Co=102 sts (
Provisional Cast-On ) -
work in st st, or in round with 3 mm dpn needle , 11-12
cm 16x6=96
Then, continue with....
SHAPE CROWN
Row 1: (k15,ssk) x 6;
Rows 2,4,6,8,10,12,14,16, 18,20,22,24,26,28,30: k;
Row 3: (k14,k2tog) x 6;
Row 5: (k13, k2tog) x 6;
Row 7: (k12, k2tog) x 6;
Row 9: (k11, k2tog) x 6;
Row 11: (k10k, k2tog) x 6;
Row 13: (k9, k2tog) x 6;
Row 17: (k8, k2tog) x 6;
Row 19: (k7, k2tog) x 6;
Row 21: (k6, k2tog x 6;
Row 23: (k5, k2tog) x 6;
Row 25: (k4, k2tog) x 6;
Row 27: (k3, k2tog) x 6;
Row 29: (k2, k2tog) x 6;
Row 31: (k1, k2tog) x 6;
Row 32: k6;
Row 33: I- cord (6 sts)- 4 rows;
Hatband pattern
Using larger needles cast on 8 sts.
Row 1:
k5sts, yfwd, k1, yfwd, k2sts; (10sts)
Row 2:
p6sts, inc, k3sts; (11 sts)
Row 3:
k4sts, p1, k2sts, yfwd, k1, yfwd, k3sts; (13sts)
Row 4:
p8sts, inc, k4sts ;(14 sts)
Row 5:
k4sts, p2sts, k3sts, yfwd, k1, yfwd, k4sts; (16sts)
Row 6: p10sts, inc, k5sts; (17sts)
Row 7: k4sts, p3sts, k4sts, yfwd, k1, yfwd,
k5sts; (19sts)
Row 8:
p12sts, inc, k6sts; (20sts)
Row 9:
k4sts, p4sts, sl1, k1, psso, k7sts, k2tog, k1 ;(18 sts)
Row 10: p10sts, inc, k7sts; (19 sts)
Row 11: k4sts, p5sts, sl1, k1, psso, k5sts,
k2tog, k1 ;(17 sts)
Row 12: p8sts, inc, k2sts, p1, k5sts; (18 sts)
Row 13: k4sts, p1, k1, p4sts, sl1, k1, psso,
k3sts, k2tog, k1 ;(16 sts)
Row 14: p6sts, inc, k3sts, p1, k5sts; (17 sts)
Row 15: k4sts, p1, k1, p5sts, s1,k1,psso,k1,
k2tog, k1 (15 sts)
Row 16:p4sts,inc, k4sts, p1, k5sts. (16 sts)
Row 17: k4sts, p1, k1, p6sts, s1, k2tog,
psso, k1 (14 sts)
Row 18: s1, p2tog, psso, (p2tog, pass 1st
stitch on right hand needle over 2nd stitch) twice, p3sts, k4sts (8 sts)
These
18 rows form the pattern, repeat them 7 times more and cast off stitches.
With wrong side of work
facing, pick up and k90 sts from edge .
After
assembling the cap rim , work an edge:
Finally after cap conclude,
provisionally split thread I started cap, reinstate stitches on the needle and
work the next edge:
In final dupa ce incheiem caciula, desfacem firul provizoriu cu care am
inceput caciula , repunem ochiurile pe andrea si lucram urmatoarea margine:
Row
1: *k1, p1, repeat
from* to end.
Row
2:*p1, k1, repeat
from * to end.
Repeat
these 2 rows 3 times more.
Another Model
"Baby
Hat With Leaf Edging"
(Copyright
Lauren Eade, Image Francie Owens)
Anyway, in my picture below, the leaf edging
on the right is the pattern I always found in many knitting stitch books and
patterns.
But the one
on the left is the one I re-wrote to face the opposite direction.
And here's my
directions for it--- and it was very tricky. Because in the knitting books'
pattern, the edging was an 18-row pattern with the last, 18th, row consisting
of binding off 5 stitches as one part of the row.
But that
could not be done in the exact same way in my re-write, so I had to add an
extra row in order to do the bind-off row properly. And then I had to add an
extra row so that the pattern would be on the correct side to repeat itself by
starting on row 1. So if you're knitting a garment with both patterns, remember
that the one I wrote has 2 extra rows, which really isn't that noticeable.
(And, in the
below picture, if the first 2 leafs look scraggly, it's because I was writing
as I went, and I was perfecting things, leaf by leaf, until I got it just
right....)
So here's my
rewrite (and it's the leaf edging on the left in the picture): Cast on 8 sts.
1. (Right
Side) K2, yo, k1, yo, K5
2. K3, k 1 f
& b, P 6 (Important: When doing the wrap for the "knitting into the
front and back" of the stitch, wrap the first wrap as if to knit, and then
for the 2nd wrap in the front make SURE you wrap from the bottom up)
3. K3, yo,
k1, yo, k2, p1, k4
4. K4, K1 f
& b, P8
5. K4, yo,
k1, yo, k3, p2, k4
6. K5, K1 f
& b, p10
7. K5, yo,
k1, yo, k4, p3, k4
8. K6, k1 f
& b, p12
9. K1, ssk,
k7, k2 tog, p4, k4
10. K7, K1 f
& b, P 10
11. K1, ssk,
k5, k2 tog, p5, k4
12. K5, p1,
k2, k1 f & b, p8
13. K1, ssk,
k3, k2 tog, p4, k1, p1, k4
14. K5, p1,
k3, k1 f & b, p6
15. K1, ssk,
k1, k2 tog, p5, k1, p1, k4
16. k5, p1,
k4, k1 f & b, p4
17. K1, sl 1,
k2 tog, psso, p6, k1, p1, k4
18. K5, p1,
k6, p2
19. P2 tog,
BO 5 sts, p1, k1, p1, k4
20. k5, p1,
k1, p1.
Repeat these 20
rows for pattern.
SIZE: Varies
2-3 (3-5) years
Finished Circumference About
17 (18 1/2) in. (43 (47) cm)
Finished Height About 11
(12) in. (28 (30.5) cm)
|
|
|
|
Gauge:
13 sts + 20 rnds = 4
in. (10 cm) over St st in the rnd (k every rnd). BE SURE TO CHECK YOUR GAUGE.
When you match the gauge in a pattern, your project will be the size specified
in the pattern and the materials specified in the pattern will be sufficient. If
it takes you fewer stitches and rows to make a 4 in. [10 cm] square, try using
a smaller size hook or needles; if more stitches and rows, try a larger size
hook or needles.
HAT
Cast on 55 (60) sts. Divide sts onto 4 needles. Place marker for beg of rnd.
Join by working the first st on left hand needle with the working yarn from the
right hand needle and being careful not to twist sts.
Work in St st in the rnd until piece measures about 4 (4 1/2) in. (10 (11.5)
cm) from beg.
Shape Top
Size 3-5 years ONLY
Note: If you are making size 2-3 years, do not work the next 4 rnds,
go directly to the first rnd in Both Sizes section.
Next
Rnd: *K10, k2tog; rep from * around - 55 sts at the end of
this rnd.
Knit 3 rnds.
Both
Sizes
Next Rnd: *K9, k2tog; rep from * around - 50 sts at the end of
this rnd.
Knit 4 rnds.
Next Rnd: *K8, k2tog; rep from * around - 45 sts at the end of
this rnd.
Knit 3 rnds.
Next Rnd: *K7, k2tog; rep from * around - 40 sts.
Knit 2 rnds.
Next Rnd: *K6, k2tog; rep from * around - 35 sts.
Knit 1 rnd.
Next Rnd: *K5, k2tog; rep from * around - 30 sts.
Knit 3 rnds.
Next Rnd: *K4, k2tog; rep from * around - 25 sts.
Knit 3 rnds.
Next Rnd: *K3, k2tog; rep from * around - 20 sts.
Knit 2 rnds.
Next Rnd: *K2, k2tog; rep from * around - 15 sts.
Knit 2 rnds.
Next Rnd: *K1, k2tog; rep from * around - 10 sts.
Knit 2 rnds.
Next Rnd: *K2tog; rep from * around - 5 sts.
Knit 2 rnds.
Next Rnd: (K2tog) twice, k1 - 3 sts at the end of this rnd.
Cut yarn, leaving a long tail. Thread tail
through remaining sts and pull to gather. Knot securely.
FINISHING
Weave in ends.


